
介绍
Fmpeg 是领先的多媒体框架,能够解码、编码、转码、混合、解密、流媒体、过滤和播放人类和机器创造的几乎所有东西。它支持最晦涩的古老格式,直到最尖端的格式。无论它们是由某个标准委员会、社区还是公司设计的。它还具有高度的便携性。
FFmpeg 可以在 Linux、Mac OS X、Microsoft Windows、BSDs、Solaris 等各种构建环境、机器架构和配置下编译、运行,并通过测试基础设施 FATE。
它包含了 libavcodec、libavutil、libavformat、libavfilter、libavdevice、libswscale 和 libswresample,可以被应用程序使用。还有 ffmpeg、ffplay 和 ffprobe,可以被终端用户用于转码和播放。
命令
注意路径不能包含空格 不然会被ffmpeg当做命令
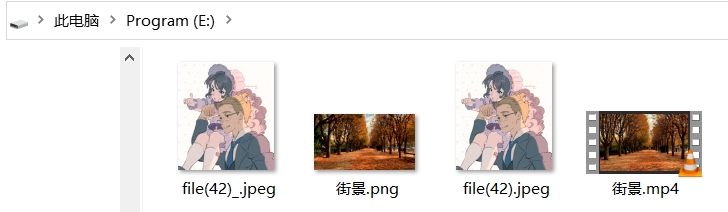
生成视频缩略图
ffmpeg -i 视频路径 -y -vframes 1 -vf scale=宽度:高度/a 缩略图路径
例如 :
ffmpeg -i e:\街景.mp4 -y -vframes 1 -vf scale=150:150/a e:\街景.png
生成图片缩略图
ffmpeg -i 图片路径 -vf scale=宽度:-1 %s -y 缩略图路径
例如:
ffmpeg -i e:\file(42).jpeg -vf scale=150:-1 -y e:\file(42)_.jpeg
效果图
通过测试可以发现 成功生成了缩略图,并且裁剪成了指定尺寸,也进行了压缩

ffmpeg安装与配置
下载
下载地址:https://pan.baidu.com/s/1YPvgfzpMgEvW7Ry870jRHw?pwd=iffy
提取码:iffy
配置环境变量
下载后解压,然后配置环境变量,指定到bin目录

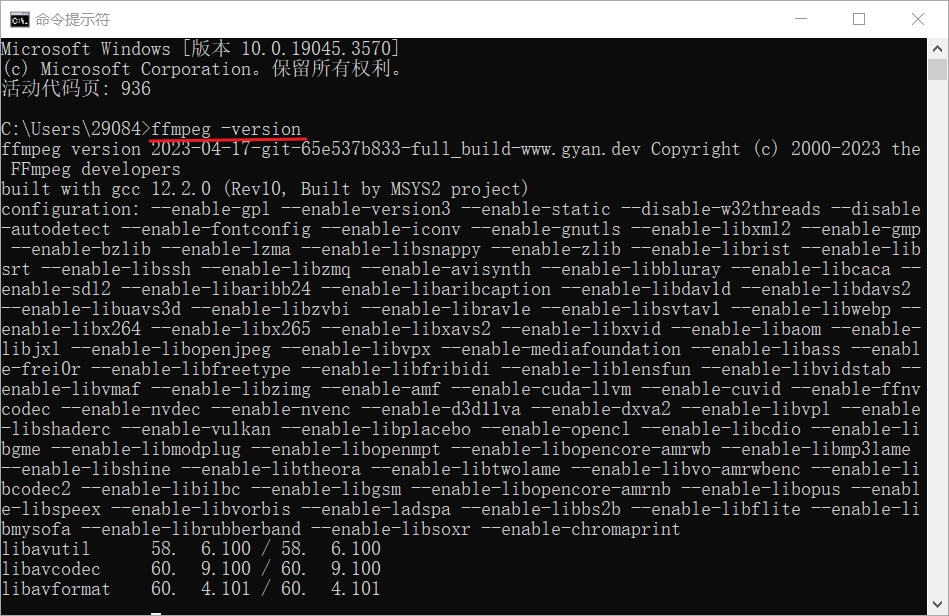
查看版本
打开cmd 执行 ffmpeg -version
出现这样的界面 说明环境变量配置成功
SpringBoot场景
Process工具类
我们通过命令来执行ffmpeg指令,因此需要利用Process类来调用操作系统的命令,在命令执行完还需取出ffmpeg线程执行过程中产生的各种输出和错误流的信息。
package easypan.utils;

import easypan.exception.BusinessException;
import org.slf4j.Logger;
import org.slf4j.LoggerFactory;

import java.io.BufferedReader;
import java.io.IOException;
import java.io.InputStream;
import java.io.InputStreamReader;

public class ProcessUtils {
    private static final Logger logger = LoggerFactory.getLogger(ProcessUtils.class);

    public static String executeCommand(String cmd, Boolean outprintLog) throws BusinessException {
        if (StringTools.isEmpty(cmd)) {
            logger.error("--- 指令执行失败,因为要执行的FFmpeg指令为空! ---");
            return null;
        }

        Runtime runtime = Runtime.getRuntime();
        Process process = null;
        try {
            process = Runtime.getRuntime().exec(cmd);
            // 执行ffmpeg指令
            // 取出输出流和错误流的信息
            // 注意:必须要取出ffmpeg在执行命令过程中产生的输出信息,如果不取的话当输出流信息填满jvm存储输出留信息的缓冲区时,线程就回阻塞住
            PrintStream errorStream = new PrintStream(process.getErrorStream());
            PrintStream inputStream = new PrintStream(process.getInputStream());
            errorStream.start();
            inputStream.start();
            // 等待ffmpeg命令执行完
            process.waitFor();
            // 获取执行结果字符串
            String result = errorStream.stringBuffer.append(inputStream.stringBuffer + "\n").toString();
            // 输出执行的命令信息

            if (outprintLog) {
                logger.info("执行命令:{},已执行完毕,执行结果:{}", cmd, result);
            } else {
                logger.info("执行命令:{},已执行完毕", cmd);
            }
            return result;
        } catch (Exception e) {
            // logger.error("执行命令失败:{} ", e.getMessage());
            e.printStackTrace();
            throw new BusinessException("视频转换失败");
        } finally {
            if (null != process) {
                ProcessKiller ffmpegKiller = new ProcessKiller(process);
                runtime.addShutdownHook(ffmpegKiller);
            }
        }
    }

    /**
     * 在程序退出前结束已有的FFmpeg进程
     */
    private static class ProcessKiller extends Thread {
        private Process process;

        public ProcessKiller(Process process) {
            this.process = process;
        }

        @Override
        public void run() {
            this.process.destroy();
        }
    }


    /**
     * 用于取出ffmpeg线程执行过程中产生的各种输出和错误流的信息
     */
    static class PrintStream extends Thread {
        InputStream inputStream = null;
        BufferedReader bufferedReader = null;
        StringBuffer stringBuffer = new StringBuffer();

        public PrintStream(InputStream inputStream) {
            this.inputStream = inputStream;
        }

        @Override
        public void run() {
            try {
                if (null == inputStream) {
                    return;
                }
                bufferedReader = new BufferedReader(new InputStreamReader(inputStream));
                String line = null;
                while ((line = bufferedReader.readLine()) != null) {
                    stringBuffer.append(line);
                }
            } catch (Exception e) {
                logger.error("读取输入流出错了!错误信息:" + e.getMessage());
            } finally {
                try {
                    if (null != bufferedReader) {
                        bufferedReader.close();
                    }
                    if (null != inputStream) {
                        inputStream.close();
                    }
                } catch (IOException e) {
                    logger.error("调用PrintStream读取输出流后,关闭流时出错!");
                }
            }
        }
    }
}
ScaleFilter工具类
ScaleFilter类定义了生成视频缩略图、生成图片缩略图和图片压缩的方法,定义了具体的ffmpeg指令。
package easypan.utils;

import lombok.extern.slf4j.Slf4j;
import org.apache.tomcat.util.http.fileupload.FileUtils;

import javax.imageio.ImageIO;
import java.awt.image.BufferedImage;
import java.io.File;

@Slf4j
public class ScaleFilter {

    // 生成视频缩略图
    public static void createCover4Video(File sourceFile, Integer width, File targetFile) {
        try {
            String cmd = "ffmpeg -i %s -y -vframes 1 -vf scale=%d:%d/a %s";
            ProcessUtils.executeCommand(String.format(cmd, sourceFile.getAbsoluteFile(), width, width, targetFile.getAbsoluteFile()), false);
        } catch (Exception e) {
            log.error("生成视频封面失败", e);
        }
    }

    // 生成图片缩略图
    public static Boolean createThumbnailWidthFfmpeg(File file, int thumbnailWidth, File targetFile, Boolean delSource) {
        try {
            BufferedImage src = ImageIO.read(file);
            // thumbnailWidth 缩略图的宽度 thumbnailHeight 缩略图的高度
            int sorceW = src.getWidth();
            int souceH = src.getHeight();
            // 小于 指定高度不能压缩
            if (sorceW <= thumbnailWidth) {
                return false;
            }
            compressImage(file, thumbnailWidth, targetFile, delSource);
            return true;
        } catch (Exception e) {
            e.printStackTrace();
        }
        return false;
    }

    // 压缩图片
    public static void compressImage(File sourceFile, Integer width, File targetFile, Boolean delSource) {
        try {
            String cmd = "ffmpeg -i %s -vf scale=%d:-1 %s -y";
            ProcessUtils.executeCommand(String.format(cmd, sourceFile.getAbsoluteFile(), width, targetFile.getAbsoluteFile()), false);
            if (delSource) {
                FileUtils.forceDelete(sourceFile);
            }
        } catch (Exception e) {
            log.error("压缩图片失败");
        }
    }
}
核心代码
当上传文件成功之后,需要生成一个缩略图,先获取文件绝对路径地址,再定义缩略图的绝对路径地址。
判断文件类型是视频还是图片,如果是视频则把视频的第一帧当做缩略图,如果是图片,裁剪成指定的尺寸再进行压缩。
// 真实文件名
String realFileName = currentUserFolderName + fileSuffix;
// 真实文件路径
targetFilePath = targetFolder.getPath() + "/" + realFileName;
// 合并文件
// union(fileFolder.getPath(), targetFilePath, fileInfo.getFileName(), true);
//视频文件切割
fileTypeEnum = FileTypeEnum.getFileTypeBySuffix(fileSuffix);
if (FileTypeEnum.VIDEO == fileTypeEnum) {
	// cutFile4Video(fileId, targetFilePath);
	// 视频生成缩略图
	cover = month + "/" + currentUserFolderName + Constants.IMAGE_PNG_SUFFIX;
	String coverPath = targetFolderName + "/" + cover;
	ScaleFilter.createCover4Video(new File(targetFilePath), Constants.LENGTH_150, new File(coverPath));
} else if (FileTypeEnum.IMAGE == fileTypeEnum) {
	// 生成缩略图
	cover = month + "/" + realFileName.replace(".", "_.");
	String coverPath = targetFolderName + "/" + cover;
	Boolean created = ScaleFilter.createThumbnailWidthFfmpeg(new File(targetFilePath), Constants.LENGTH_150, new File(coverPath), false);
	if (!created) {
		FileCopyUtils.copy(new File(targetFilePath), new File(coverPath));
	}
}
评论区